Cary Pollak for Whisk and Quill
September 12, 2013
Those of you who have enjoyed summertime performances at the Wolf Trap National Park for the Performing Arts here in the Washington, DC area know that enjoying a picnic on the lawn before the show is part of the fun. At one such outing I was commandeered to provide dessert and was eager to bring something both beautiful as well as delicious. The friends I was joining that evening tend to think that the presentation on the picnic table is almost as important as the one on stage. With that challenge in mind I made a large French tarte with freshly baked crust, pastry cream, summer fruits and a shiny apple glaze. This stunning final act is perfect for dining al fresco or at home at a formal dinner party.

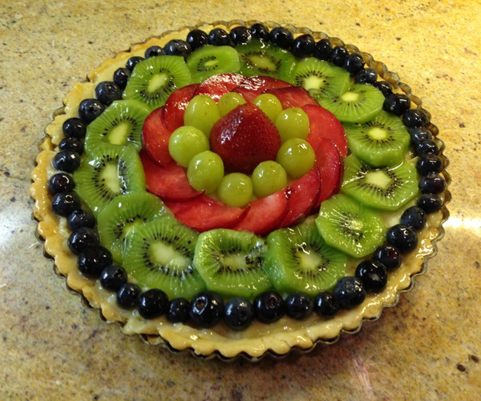
12 ½ inch tart with strawberries, green grapes, red plums, blueberries and kiwi fruit
The origin of the modern fruit tart is less than clear, but it is known that French and Italian Renaissance chefs developed several pastry doughs still popular today. The Propre New Booke of Cokery published in England in 1545 contains a recipe for making “shorte paest for tart” that would look familiar to today’s pastry chefs. Most likely the first fruit tart to gain notoriety as an individually named dessert was created by the Tatin sisters for the restaurant in their hotel in the village of Lamotte-Beuvron, France in the late 1800’s. This upside down apple tart with caramelized fruit concealed beneath a pastry crust, was made famous after the sisters’ demise by the iconic Maxim’s in Paris, where it was called for the first time, “Tarte Tatin.”
Fruit tarts can be made in any home kitchen. It’s easier than expected and well worth the effort. You will need a French tart pan with a removable bottom, a stand mixer and a food processor. The electric appliances are not entirely essential in that these tarts were made for decades before such conveniences were invented. For some cooks there is a tactile satisfaction to cutting cold pieces of butter into flour by hand to create the dough, but the speed of an electric food processor transforms the tart making process from daunting to doable.
French tart pans produce impressive results, but they must be handled with care. Always lift them by the edges. The removable bottom makes it easy to pop off the rim and place the tart on a dish when it is ready to be served. But if you attempt to lift the pan by the bottom at any point before that, the rim can slip off and the tart slide to the floor. At that point you could be muttering curses far stronger than “Sacre bleu!”
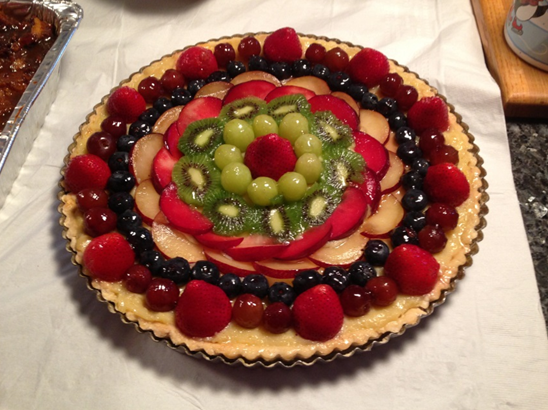
9 ½ inch tart with strawberry, green grapes, red plums, kiwi fruit and blueberries
The main types of pastry dough used in French cooking are pâte brisée, pâte sucrée and pâte sablée, all of which consist mostly of butter and flour. The first is a standard pie dough; the second, as the name implies, contains more sugar; and the third is a more coarsely textured dough reminiscent of sand. There are so many variations in the recipes that can be found for each, that the distinctions tend to blur. The following recipe is not definitive and can be tweaked to your liking. It makes enough dough for two 10-inch tart pans.
[color-box]Pâte Sablée
2 ½ cups of all-purpose flour
1 tablespoon of sugar
16 tablespoons of butter, very cold and cut into cubes
1 large egg, stirred slightly to break up the yolk
¼ cup of water
½ teaspoon salt[/color-box]
Preheat oven to 375 degrees. Butter the inside of a tart pan and dust it with flour tapping out any loose flour. Place the dry ingredients into a food processor fitted with the chopping blade and pulse briefly to combine. Add butter and pulse for several seconds at a time until the mixture resembles coarse meal. Add liquid ingredients and process until the dough is formed. Divide the dough into two equal parts, wrap each in plastic wrap and refrigerate for 20-30 minutes.
On a floured board roll out one of the dough portions into a disk one inch larger than the 10-inch tart pan. It is best to use a standard French rolling pin, which is a wooden cylinder 19- or 20-inches long and just under two inches in diameter. It gives greater control and a larger working surface than the more familiar type of rolling pin with the two small handles on either end. The dough can then be transferred to the tart pan by placing the rolling pin in the middle of it, folding it over the pin, then raising it up and lowering it into the pan. Lift up the dough that overlaps the pan a little bit at a time so that you can press the dough into the edge between the bottom and the rim, all around the pan. Make sure that the dough is flush against the rim and of uniform thickness all around. Use a sharp paring knife to trim the dough flush with the edges of the pan.
A common instruction at this point is to line the pan with parchment or wax paper weighted down with pie weights or dried beans and bake for about 20 minutes. Remove paper and weights and continue baking for about 10 minutes until the crust is golden brown. A short cut I prefer starts by making sure the crust is well pricked to allow for steam to escape rather than form bubbles during the baking process. Cut strips of foil into two-inch by six-inch sections. Fold them in half lengthwise and bend them into a curved shape. Place them end to end in upside down “V’s” around the perimeter of the crust, so that they form a loose fitting “tent.” This will prevent the edges of the crust from browning more quickly than the bottom. In about 25 minutes the crust should be uniformly golden brown without the need for a second trip to the oven, but be sure to watch the crust, not the clock. You may have to remove the foil for the last few minutes to make sure the fluted edges are done.
The vanilla pastry cream (crème patissière) is a cooked filling that should be solid enough to support a layer of fruit and glaze. As with French pastry dough the recipes vary from cookbook to cookbook. The one below is a more traditional type in that the starch used is flour. Other recipes use a mixture of flour and cornstarch or cornstarch alone.
[color-box]Vanilla Pastry Cream
5 egg yolks
½ cup of sugar
¼ cup of all-purpose flour
1 ½ cups of milk
2 teaspoons of vanilla extract[/color-box]
Using an electric mixer with a whisk attachment, mix the yolks for a few seconds. Add the sugar, then the flour, and beat to a thick paste. Heat the milk in a pot just until it comes to a boil. Continue beating while pouring the milk slowly into the bowl, and add the vanilla. Transfer the mixture back to the pot and simmer for two minutes, stirring constantly, to cook the flour. Cool the pastry cream by placing it in a bowl and covering the surface with wax paper to prevent the formation of a crust. Refrigerate if you wish to speed up cooling.
Fill the pastry crust with an even layer of pastry cream. Now you are ready for the creative part. You could make a tart that features only your favorite fruit, or you could assemble many colorful fresh fruits. The latter could be used to create a random spattering of different fruits, or a number of sections, each devoted to a single fruit. Better still, find the center point of the tart (with a tape measure if necessary) and build from there. Think in terms of concentric circles and contiguous or overlapping fruits. The tart is your canvas and the fruits are your paints.
12 ½ inch tart with strawberries, red and green grapes, blueberries, black and red plums and kiwi fruit
Speaking of painting, the final step is to brush on a glaze. This preserves the color and freshness of the tart and adds a beautiful sheen. Melt down jelly in a pot with a little water. Let it cool until it is no longer hot, but still liquid enough to be applied with a pastry brush. I like to use apple jelly, but you can also use apricot, which is clear enough in color and light enough in flavor to enhance, rather than compete with the fruits.
A gorgeous fruit tart is something you will want to share with your friends. Don’t be alarmed if you feel a tug of hesitation when guests are ready to cut the first slice. Be sure to snap a picture to immortalize your masterpiece. That way you can preserve your tart for posterity…and eat it too.
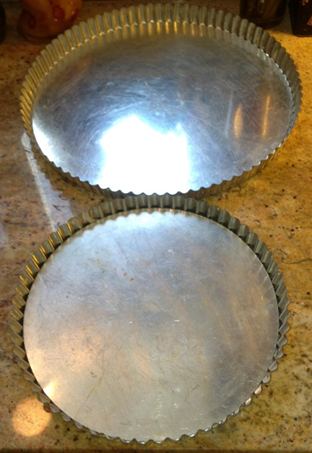
French tart pans, 9 ½ inch and 12 ½ inch diameter
Photo Credits: Cary Pollak
Leave a Reply